Deploy the Azure Components
published by: Tyler Lu
-
In your web browser, navigate to your fork of this repository.
-
Click the Deploy to Azure button below:

-
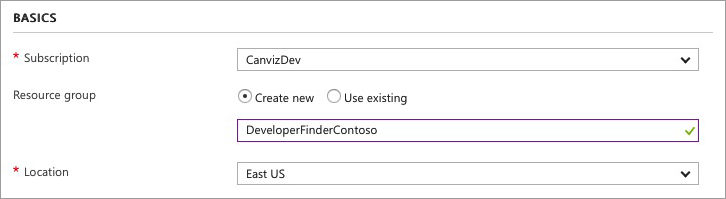
Fill in the values in the deployment page:
-
Resource group:
We suggest you create a new resource group and name it DeveloperFinder[Suffix].
-
Location:
IMPORTANT NOTE: Web App for Containers are currently (as of September 2017) not available in all regions. You must choose one of the regions listed in this article.
-
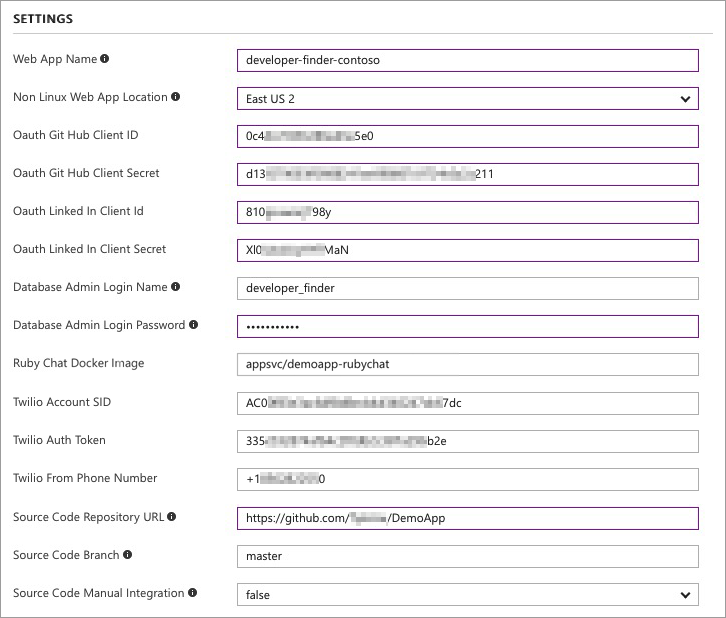
Web App Name:
Use the name you chose at the start of these instructions that follows the developer-finder-[suffix] naming convention.
-
Web App Location:
IMPORTANT NOTE: You MUST choose a different region for the web application, because they cannot be created in the same region and the same resource group.
-
OAuth Git Hub Client Id & Secret:
Use the client id and secret of the GitHub OAuth app.
-
OAuth LinkedIn Client Id & Secret:
Use the client id and secret of the LinkedIn OAuth app.
-
Database Admin Login Name:
It cannot be ‘azure_superuser’, ‘admin’, ‘administrator’, ‘root’, ‘guest’ or ‘public’.
-
Database Admin Login Password:
This field should be between 8 and 128 characters long. Your password must contain characters from three of the following categories – English uppercase letters, English lowercase letters, numbers (0-9), and non-alphanumeric characters (!, $, #, %, etc.).
-
Ruby Chat Docker Image:
Please keep the default value: appsvc/demoapp-rubychat.
-
Twilio Account SID & Auth Token & From Phone Number.
They are optional. Use the values you got from your Twilio account.
-
Source Code Repository URL:
Use the URL of the repository you just cloned.
-
-
Check I agree to the terms and conditions stated above.
-
Click Purchase.
-
Wait until the ARM template deployment process completes.